This article explores the way the microservices can be used together with Java EE using KumuluzEE. It expands on the benefits and drawbacks compared to the monolithic architecture that’s popular in Java EE. It shows how to quickly and simply develop two microservices with standard Java EE using KumuluzEE. You can find the examples produced in this article on GitHub under the name microservice-simple.
WHY MICROSERVICES?
The industry standard approach for deploying Java EE applications is packing all components into single EAR/WAR archive and deploying the archive on an application server. Although this approach has several advantages, particularly from the ease-of-development perspective, it leads to monolithic architecture, makes applications difficult to maintain, and - particularly important - makes such applications more difficult and sometimes impossible to scale to meet today’s real world demands, especially in PaaS (cloud) environments.
Microservice architecture addresses these shortcomings by decomposing an application into a set of microservices. Each microservice has well-defined functionalities and an interface to communicate with other microservices (such as REST, WSDL, or if needed even RMI). Most often, microservices are stateless.
Instead of packing all microservices into a single archive (EAR/WAR), each microservice is developed and deployed independently of each other. This brings several advantages, such as:

Microservice approach also has its drawbacks, particularly in the added complexity, related to development and particularly to the deployment. To deploy microservices on stand-alone containers requires several steps, such as configuring the containers, defining the dependencies, deploying the microservices, etc.
KumuluzEE
Enter KumuluzEE, a framework that automates the tasks, related to the deployment and configuration of Java EE applications following the microservice pattern and makes it seamless. We will showcase how you can use KumuluzEE to create microservices using standard Java EE APIs that run in every Java environment as any other Java application with little to no extra configuration thus eliminating the need for an application server.
Getting started
Let’s get started! First let’s examine what KumuluzEE provides and how we can start using it to build our microservices. The main benefit is that we don’t actually have to learn “yet another framework”. KumuluzEE uses the standard Java EE specifications and components that many developers and DevOps including us are very familiar with. In fact if you use the default configuration (which is perfectly fine for most cases) and control your settings with environment variables that you as well as KumuluzEE defines, you don’t have to write anything extra at all. You get the microservice benefits “for free”.
You can write your microservices the same way you write your Java EE applications, using the same tools you always use. The framework will take care of bootstrapping all the required components to make your application run.
The result are small standalone (and preferably stateless) microservices that can run anywhere (remember “Write once, run anywhere”) using technologies that used to require full blown heavyweight application servers.
Perfect for running in modern Dockerized environments
Using KumuluzEE we can easily break down existing monolithic applications into microservices and start deploying them to the cloud. Since microservices with KumuluzEE are basically regular Java applications, they can run in virtually every cloud platform available or otherwise, thus offering an excellent middle ground between modern patterns/models and existing enterprise technologies.
Components
KumuluzEE comes with support for several Java EE specifications that we can selectively use in our microservices. As of this writing KumuluzEE comes with the following technologies:
You can selectively choose to include only those that you actually need. This means that you can select only the dependencies and components that you use, instead of always having the entire runtime present that’s using your memory and slowing your microservice down, as well as allow each and every microservice you create to have its own tailored runtime.
For certain components you can also choose which implementation you would like to include, in case you prefer one or the other. The component list and their implementations that are available is constantly being updated and can be found on GitHub.
KumuluzEE is also fully compliant with MicroProfile 1.0. As we will show later, you can choose to include the MicroProfile 1.0 profile, which already contains JAX-RS, CDI and JSON-P.
Building Java EE microservices
The premise is simple; use our existing knowledge of Java EE APIs to create multiple microservices that will be packaged and deployed independently to a scalable cloud platform.
Let’s take KumuluzEE for a spin and see it in action. Let’s start with an example. Supposed we would like to create an online book catalogue that people can browse and place orders for the books they like. While there would normally be many more functionalities, of course, for brevity we are only going to look at the two of them; browsing available books and placing orders. Our goal will be to create an application with the following requirements:
With traditional application servers we would normally create a monolithic EAR package that would include our business logic and several WAR packages. Our architecture would look something like this:
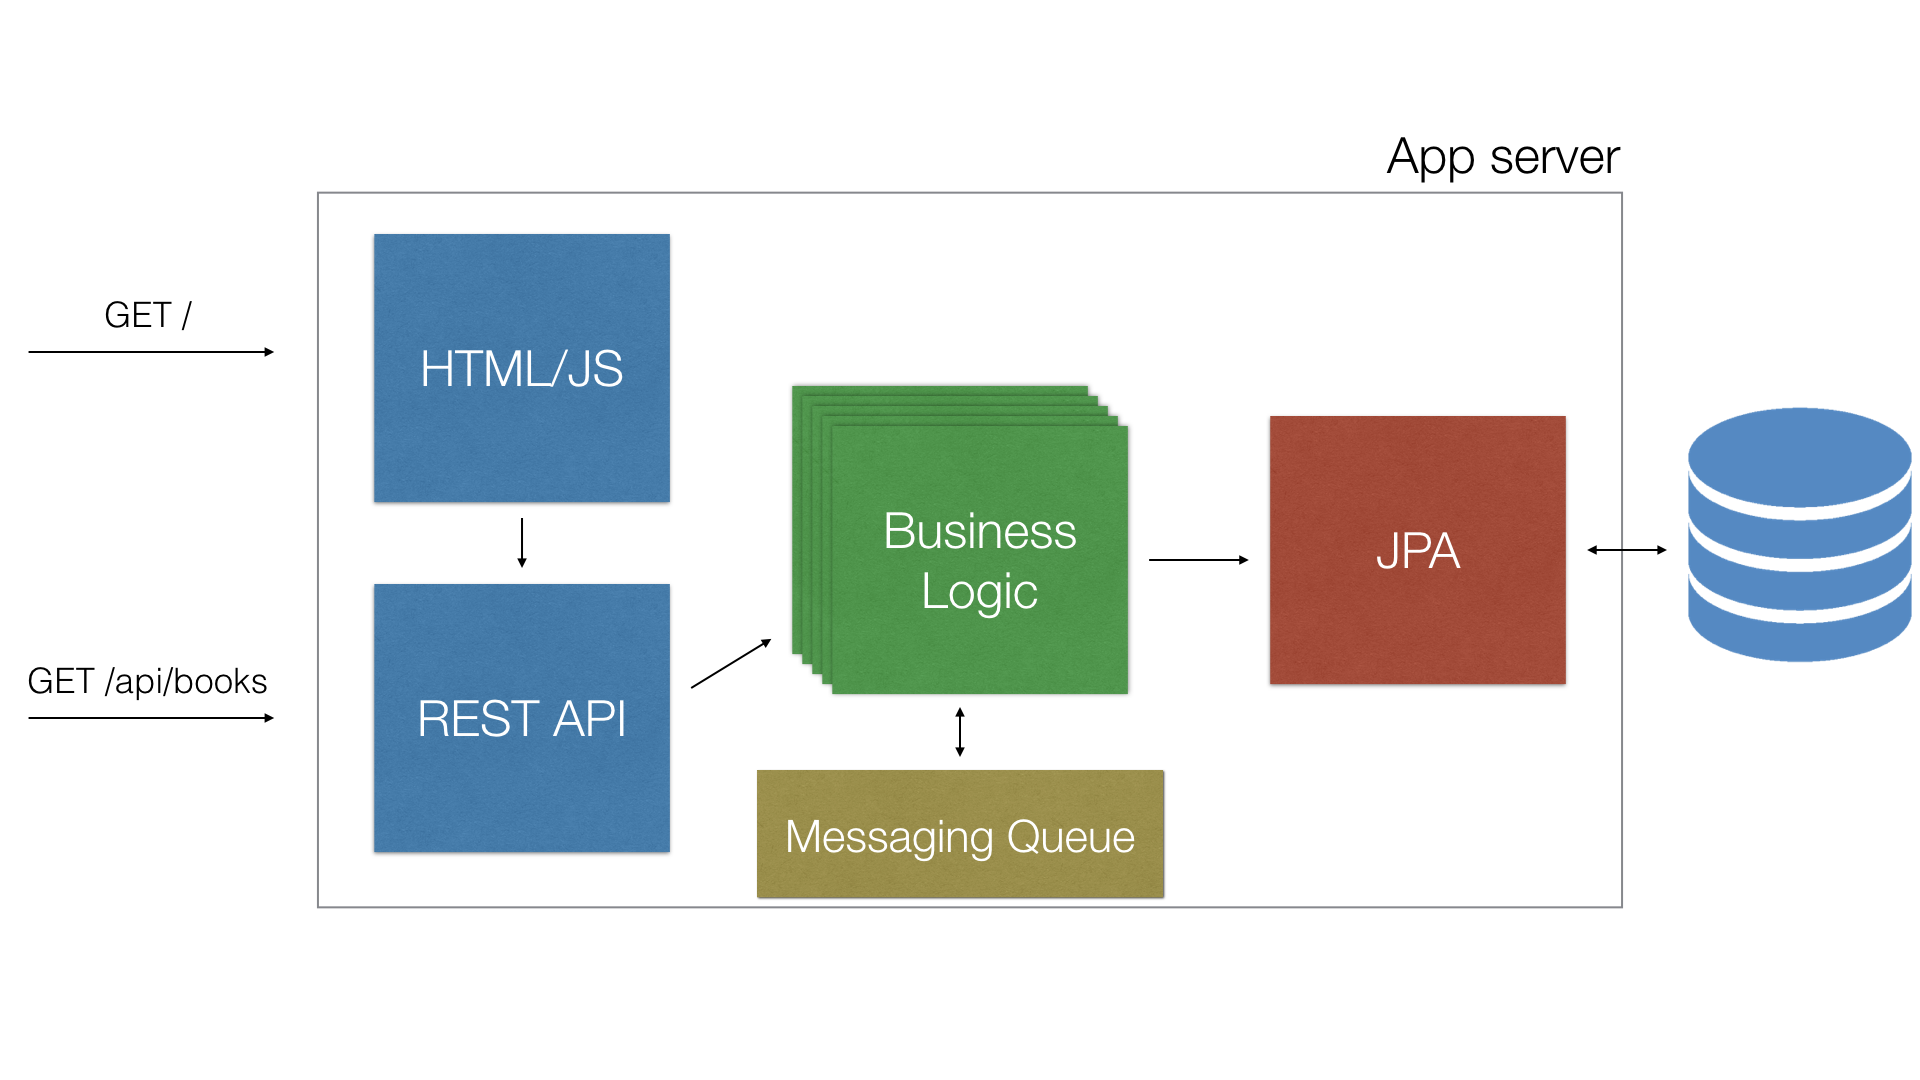
We would have several beans deployed that would handle all the business logic, those would use a JPA or some other database module that would handle access to an underlying database and optionally as act as our ORM. We would then expose our app to the world with a series of REST APIs. These would then go on to call our business logic. To show the actual content we would use a static HTML5 JavaScript web app, written in any of the multiple (and growing) modern JS frameworks available today. They would then go on to call our REST API to access all the functionality. All the components would be packaged together into a single EAR and deployed to the application server.
At first this may seem as a perfectly good design. However we can quickly start to identify its shortcomings. When our application starts to grow and we get more and more traffic, we need to start scaling out. We can start to scale up, however that can only get us so far. Sooner rather than later we need to start distributing our requests. The way we do that is to set up, configure and maintain a cluster of application servers which is usually - let’s face it - a not so pleasant experience. And since virtually no cloud provider offers support for such configurations we are basically on our own. Even if we do manage set it all up somewhat efficiently, we still have no real simple way to provide true elasticity and scalability to our application.
Let’s dig into some more problems:
Many of these issues don’t have a straightforward solution using the traditional monolithic approach.
How can KumuluzEE solve these problems
So let’s try the microservice approach and refactor our architecture to follow the microservice architectural pattern while continuing to use standard Java EE technologies. To achieve this, we are going to use the KumuluzEE framework:
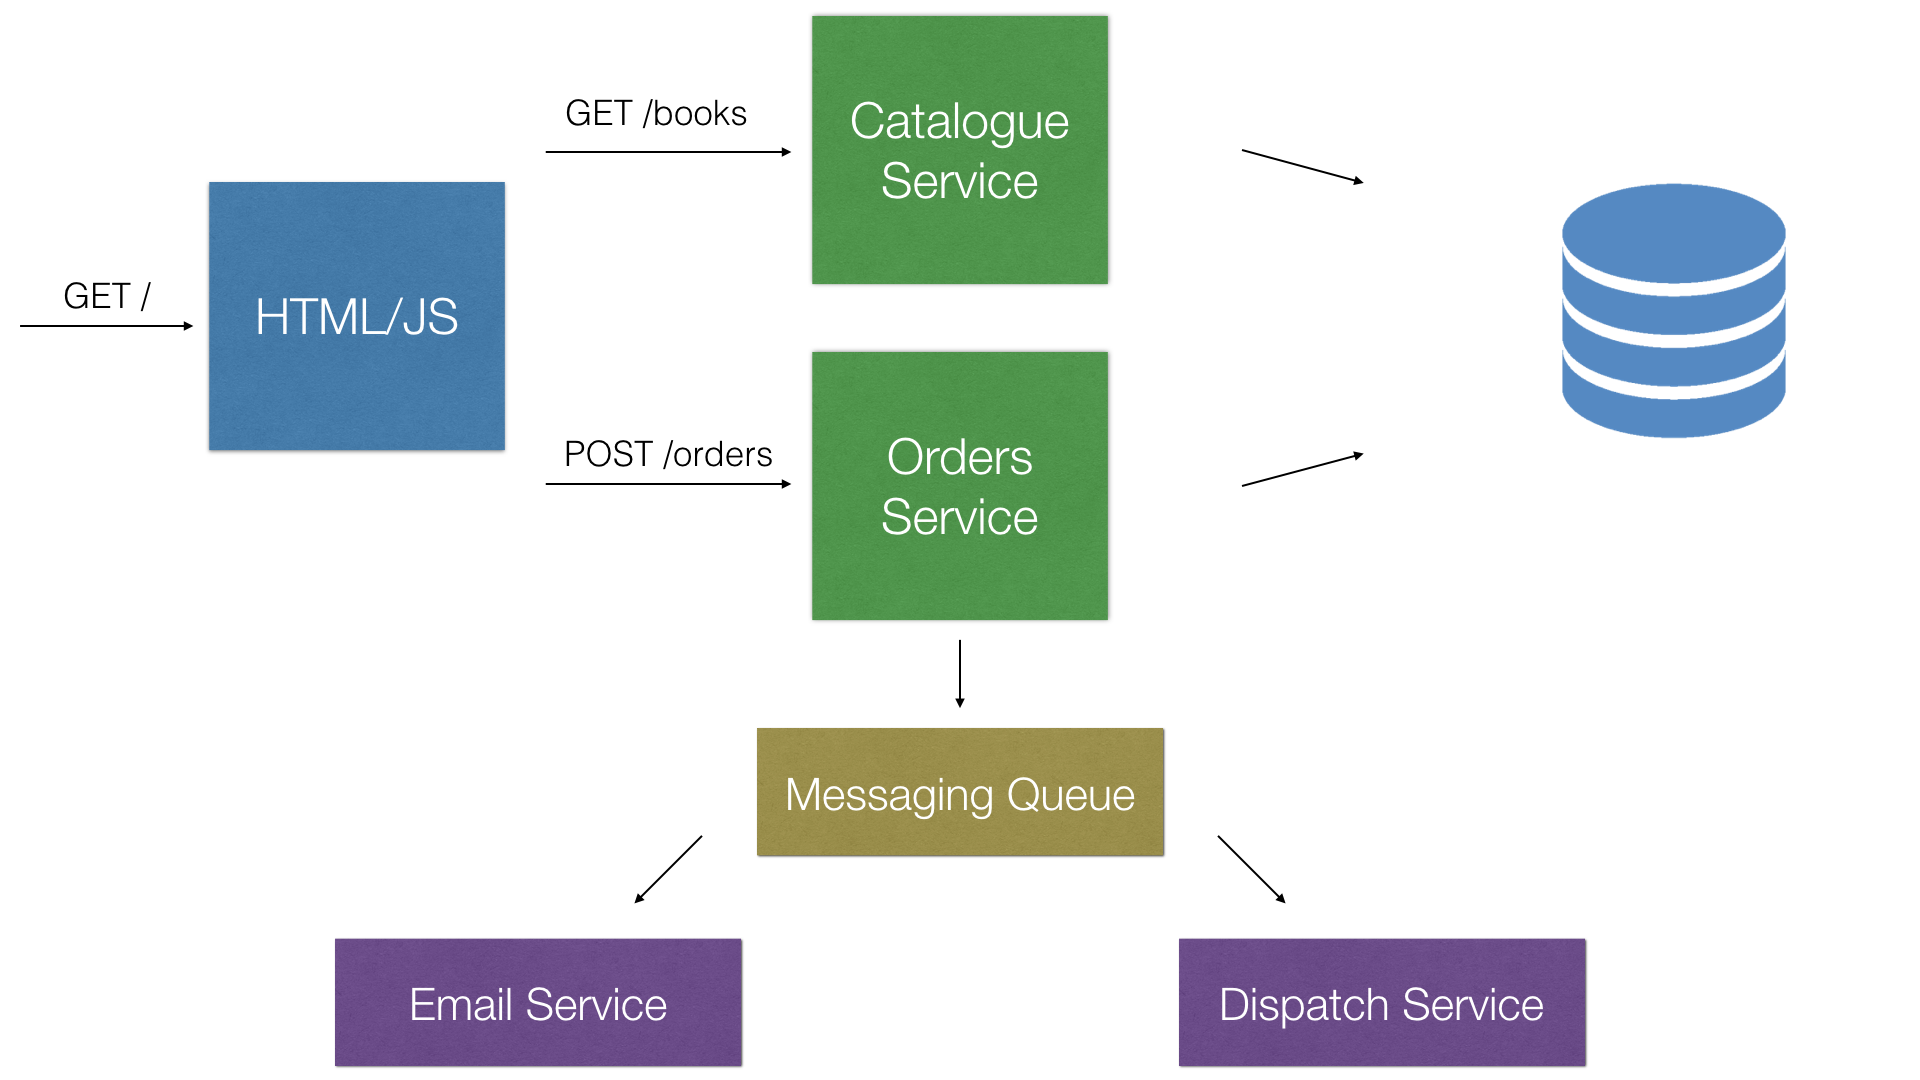
We start by separating our concerns and split the catalogue and orders functionalities into two separately configured and deployed microservices. That way we have created microservices that are only concerned with their respected functionalities. We’ve also reduced the interference with one another and overall form a better modular and bug free application. Each one of them will communicate with each other through pre-defined REST interfaces.
If we look at the problems we listed we can see that now with microservices we have a straightforward solution for each and every one of them:
We do however need to make sure that the microservices are stateless in nature as specific instances can be destroyed, started or moved at any time. Every resource that a microservice uses should be an external one that we can configure via the environment. For instance; PostgreSQL as a database, RabbitMQ as a messaging service, Redis as a cache provider and S3 or Swift as file storage.
However, this kind of approach does not come without its drawbacks. Setting up and configuring Java EE projects to accompany this kind of architecture may not be so trivial.
We would also like to avoid using an application server instance for every microservice to reduce overhead and simplify configuration. This is where KumuluzEE comes in; it makes deployment and configuration seamless.
Now that we know what we want to do, let’s write our microservices (finally)!
Maven
We will create two projects, each one will contain its own microservice. To simplify we will create both projects in the same repository. In real-world projects it is recommended to have a separate repository (git or otherwise) for each microservice so that they are treated as separate entities and have separate versioning and revision history as well as deployment.
We will be using Maven to create the application as that is our system of choice and currently the only build system supported.
Our project structure will look like this:
Again this is only to simplify the example. In a real project thecatalogue and ordersfolders/projects would each be in a separate repository. We have also added a module that will hold our JPA entities as they will be shared with our two microservices, again, to simplify the example. First let’s create the top-mostpom.xml that will only serve in this example to include our main modules. We will be using acme.comas our package name and group id throughout the examples, however the GitHub page will contain different package and artifact names to better match the overall samples structure.
<?xml version="1.0" encoding="UTF-8"?>
<project xmlns="http://maven.apache.org/POM/4.0.0"
         xmlns:xsi="http://www.w3.org/2001/XMLSchema-instance"
         xsi:schemaLocation="http://maven.apache.org/POM/4.0.0 http://maven.apache.org/xsd/maven-4.0.0.xsd">
    <modelVersion>4.0.0</modelVersion>

    <groupId>com.acme.books</groupId>
    <artifactId>books</artifactId>
    <version>1.0.0-SNAPSHOT</version>
    <packaging>pom</packaging>

</project>
Now let’s create our first microservice project. We will be using maven archetype generation.
Run the following commands inside the project folder. This will generate the three projects we require.
$ mvn -B archetype:generate \
    -DarchetypeGroupId=org.apache.maven.archetypes \
    -DgroupId=com.acme.books \
    -DartifactId=catalogue
$ mvn -B archetype:generate \
    -DarchetypeGroupId=org.apache.maven.archetypes \
    -DgroupId=com.acme.books \
    -DartifactId=orders
$ mvn -B archetype:generate \
    -DarchetypeGroupId=org.apache.maven.archetypes \
    -DgroupId=com.acme.books \
    -DartifactId=models
Add KumuluzEE
Now we need to add the appropriate dependencies. As mentioned the framework is completely modular which means that apart from the core functionality every Java EE component is packaged as a separate module and must be included explicitly as a dependency in order to use it. KumuluzEE will automatically detect which modules are included and properly configure and enable them.
All modules are versioned and released together, which helps reducing cross version conflicts and bugs. You can define a property with the current version of KumuluzEE to use it with every dependency or import the KumuluzEE BOM module, which will include the correct module dependency definitions in your project. In this sample we will use the latter.
NOTE: Use the same version for every module as not doing so might result in unexpected behavior.
We will import the BOM to our parent pom.xml, which includes all of KumuluzEE’ dependency definitions. This will allow us to include any KumuluzEE module without specifing its version.
<properties>

</properties>

<dependencyManagement>
    <dependencies>
        <dependency>
            <groupId>com.kumuluz.ee</groupId>
            <artifactId>kumuluzee-bom</artifactId>
            <version>${kumuluzee.version}</version>
            <type>pom</type>
            <scope>import</scope>
        </dependency>
    </dependencies>
</dependencyManagement>
First we must include the core module to our first microservice catalogue. The core includes the main bootstrapping logic and configuration to start your microservice.
<dependency>
    <groupId>com.kumuluz.ee</groupId>
    <artifactId>kumuluzee-core</artifactId>
</dependency>
This is the bare minimum required to run a microservice with plain servlets and static files. Let’s try it out! KumuluzEE will use a webappfolder at the root of your resource folder to look for files and configuration regarding it. This is the only difference to the standard Java EE file structure as the webappfolder has to be inside the resource folder, not alongside it.
We don’t need to include a web.xml file, because KumuluzEE supports annotation scanning as per the specification. However, when and if you need it, you can simply add it and it will be automatically detected and used.
Let’s add a simple HTML file.
<!DOCTYPE html>
<html>
<head>
    <meta charset="utf-8" />
    <title>Book catalogue</title>
</head>
<body>
    <p>Here we could display the book catalogue</p>
</body>
</html>
And this is all you need to do. The kumuluzee-corepackage provides the class com.kumuluz.ee.EeApplicationwith a main method that will bootstrap your app. If you have your project opened in an IDE (IntelliJ, Eclipse, …), you can now start the microservice creating a new run configuration, selecting Java application and enter the above class as the Main class attribute. If however you are looking to run it from the terminal (as will be the case on a server and various PaaS environments), then you run it directly from the class files in the target directory.
NOTE: If you forget to add the webapp folder or accidentally misplace it, KumuluzEE will warn you with very descriptive messages.
To do so, you must include the maven-dependency-pluginto your pom.xml file, which will copy all your dependencies together with your classes.
<plugin>
    <groupId>org.apache.maven.plugins</groupId>
    <artifactId>maven-dependency-plugin</artifactId>
    <executions>
        <execution>
            <id>copy-dependencies</id>
            <phase>package</phase>
            <goals>
                <goal>copy-dependencies</goal>
            </goals>
            <configuration>
                <includeScope>runtime</includeScope>
            </configuration>
        </execution>
    </executions>
</plugin>
Run maven package and then you can start your microservice using the following command:
$ java -cp catalogue/target/classes:catalogue/target/dependency/* com.kumuluz.ee.EeApplicationGo to http://localhost:8080/ in your browser and you should see the HTML file that we added.
And that is it. We went through our project structure and a basic overview of what KumuluzEE does for you. You add the required dependencies and start developing standard Java EE applications.
Using standard Java EE to implement our microservices
We’ll continue and add the remaining required dependencies. We will need JAX-RS for the REST interfaces (JPA will be included in the modelsmodule). For simplicity, we will add CDI as well, as it comes with as it comes with full support for resource injecting (e.g. EntityManagerinjection using @PersistenceContext). However, we could just as well do without it to keep our microservice even lighter. For all the components we will add, we will use their reference implementations. However you are free to chose any other ones (e.g. Hibernate for JPA) that are supported. They will function identically with regards to the Java EE specification and APIs.
<dependency>
    <groupId>com.kumuluz.ee</groupId>
    <artifactId>kumuluzee-jax-rs-jersey</artifactId>
</dependency>
<dependency>
    <groupId>com.kumuluz.ee</groupId>
    <artifactId>kumuluzee-cdi-weld</artifactId>
</dependency>
Again if we wanted additional components we can simply add them to our dependency list along side the ones we just added and it will just work. You can find the updated list at the frameworks github page.
If you don’t want to individually select the components in advance or don’t need/want to fully customize your microservice, KumuluzEE also comes with a number of predefined profiles that contain the more popular combinations of components. Including, as of version 2.1.1, the microProfile-1.0 profile with support for the MicroProfile 1.0 specification, following the announcement of KumuluzEE joining microprofile.io as a member.
JPA module
In the JPA module we will add our persistence.xmland entity classes that will be shared with both our microservices even though they will be ran separately. In the example we will use a PostgreSQL database. However, you are free to use any database JPA and Java supports. Just add the driver as a dependency.
<dependency>
    <groupId>com.kumuluz.ee</groupId>
    <artifactId>kumuluzee-jpa-eclipselink</artifactId>
</dependency>
<dependency>
    <groupId>org.postgresql</groupId>
    <artifactId>postgresql</artifactId>
    <version>42.0.0</version>
</dependency><?xml version="1.0" encoding="UTF-8" ?>
<persistence xmlns="http://xmlns.jcp.org/xml/ns/persistence"
xmlns:xsi="http://www.w3.org/2001/XMLSchema-instance"
xsi:schemaLocation="http://xmlns.jcp.org/xml/ns/persistence
http://xmlns.jcp.org/xml/ns/persistence/persistence_2_1.xsd"
version="2.1">
<persistence-unit name="books" transaction-type="RESOURCE_LOCAL">
<non-jta-data-source>jdbc/BooksDS</non-jta-data-source>
<class>com.acme.books.models.Book</class>
<class>com.acme.books.models.Order</class>
<properties>
<property name="javax.persistence.schema-generation.database.action" value="create"/>
<property name="javax.persistence.schema-generation.create-source" value="metadata"/>
<property name="javax.persistence.schema-generation.drop-source" value="metadata"/>
</properties>
</persistence-unit>
</persistence>You can quickly notice we are not using JTA transaction and datasources in our JPA module. We have opted out of using JTA in this example in order to keep the microservice as light as possible as we will only have a single external resource (DB) and as such have no real need for it.
Configuration of the datasources and other preferences is handled with the KumuluzEE config extension, as this particular part is not handled by any Java EE specification. In short, everything in KumuluzEE (including your own settings) is configured through the main config.yaml file located at the root of the resources folder. Every value inside it can be overwriten with environemnt variables or system properties as well as any additional config sources you add (e.g. etcd and similar). A detailed overview of the framework will be described in following blog posts.
kumuluzee:
  datasources:
    - jndi-name: jdbc/BooksDS
      connection-url: jdbc:postgresql://localhost:5432/postgres
      username: postgres
      password: postgres
      pool:
        max-size: 20
Every value defined in the yaml file can be overwritten by setting the approriate environment variable. For example, if we want to override the datasource password we can set the environemnt variable KUMULUZEE_DATASOURCES[0]_PASSWORDbefore we start our microservice. We can quickly see a pattern how we can access and override any variable in the config file.
Next we need to create our entities.
@Entity
@Table(name = "books")
@NamedQuery(name = "Book.findAll", query = "SELECT b FROM Book b")
public class Book {

    @Id
    @GeneratedValue(strategy = GenerationType.IDENTITY)
    private Integer id;

    private String title;

    private String description;

    private String author;

    @OneToMany(mappedBy="book")
    private List<Order> bookOrders;

    public Integer getId() {
        return id;
    }

    public void setId(Integer id) {
        this.id = id;
    }

    public String getTitle() {
        return title;
    }

    public void setTitle(String title) {
        this.title = title;
    }

    public String getDescription() {
        return description;
    }

    public void setDescription(String description) {
        this.description = description;
    }

    public String getAuthor() {
        return author;
    }

    public void setAuthor(String author) {
        this.author = author;
    }

    public List<Order> getBookOrders() {
        return bookOrders;
    }

    public void setBookOrders(List<Order> bookOrders) {
        this.bookOrders = bookOrders;
    }
}@Entity
@Table(name = "orders")
@NamedQuery(name = "BookOrder.findAll", query = "SELECT o FROM Order o")
public class Order {
@Id
@GeneratedValue(strategy = GenerationType.IDENTITY)
private Integer id;
@Temporal(TemporalType.TIMESTAMP)
private Date orderDate;
@ManyToOne
@JoinColumn(name="book_id")
private Book book;
public Integer getId() {
return id;
}
public void setId(Integer id) {
this.id = id;
}
public Date getOrderDate() {
return orderDate;
}
public void setOrderDate(Date orderDate) {
this.orderDate = orderDate;
}
public Book getBook() {
return book;
}
public void setBook(Book book) {
this.book = book;
}
}Orders module
Now let’s implement the orders module. We’ll create an order resource that will contain two methods; placeOrder(Book) andgetOrder(). We need to add the correct dependencies, a JAX-RS application and a JAX-RS resource. For this microservice we will add the MicroProfile 1.0 profile, which coincidentally, includes the exact correct components we need.
NOTE: Don’t forget to add the webapp folder to the root of your orders resource directory. You may also need to add a file inside the directory for certain tools to include the folder. In any case you should get very descriptive error messages.
<dependency>
    <groupId>com.acme.books</groupId>
    <artifactId>models</artifactId>
    <version>${project.version}</version>
</dependency>
<dependency>
    <groupId>com.kumuluz.ee</groupId>
    <artifactId>kumuluzee-microProfile-1.0</artifactId>
</dependency>

...

<plugin>
    <groupId>org.apache.maven.plugins</groupId>
    <artifactId>maven-dependency-plugin</artifactId>
    <version>2.10</version>
    <executions>
        <execution>
            <id>copy-dependencies</id>
            <phase>package</phase>
            <goals>
                <goal>copy-dependencies</goal>
            </goals>
            <configuration>
                <includeScope>runtime</includeScope>
            </configuration>
        </execution>
    </executions>
</plugin>
The application:
@ApplicationPath("/")
public class OrdersApplication extends javax.ws.rs.core.Application {

}
We will also create a class to hold our configuration parameters we will need. In this case the URL to the catalogue service, so we can correctly query the book details using its identification number. For now we will use a static value, you can take a look at the full example on GitHub to see how to integrate with the KumuluzEE config extension.
@ApplicationScoped
public class OrdersProperties {

    private String catalogueUrl = "http://localhost:3000";

    public String getCatalogueUrl() {
        return catalogueUrl;
    }

    public void setCatalogueUrl(String catalogueUrl) {
        this.catalogueUrl = catalogueUrl;
    }
}
And the resource:
@Path("/orders")
@RequestScoped
@Consumes(MediaType.APPLICATION_JSON)
@Produces(MediaType.APPLICATION_JSON)
public class OrdersResource {

    @PersistenceContext(unitName = "books")
    private EntityManager em;

    @Inject
    private OrdersProperties ordersProperties;

    @GET
    @Path("/{id}")
    public Response getOrder(@PathParam("id") Integer id) {

        Order o = em.find(Order.class, id);

        if (o == null)
            return Response.status(Response.Status.NOT_FOUND).build();

        return Response.ok(o).build();
    }

    @POST
    public Response placeOrder(Book b) {

        if (b == null || b.getId() == null) {
            return Response.status(Response.Status.BAD_REQUEST).build();
        }

        Response bookResponse = ClientBuilder.newClient()
                .target(ordersProperties.getCatalogueUrl()).path("books").path(b.getId().toString()).request().get();

        if (!bookResponse.getStatusInfo().getFamily().equals(Response.Status.Family.SUCCESSFUL)) {
            return Response.status(Response.Status.NOT_FOUND).build();
        }

        Order o = new Order();
        o.setBook(bookResponse.readEntity(Book.class));
        o.setOrderDate(new Date());

        em.getTransaction().begin();

        em.persist(o);

        em.getTransaction().commit();

        return Response.status(Response.Status.CREATED).entity(o).build();
    }
}
As you can see the microservice is exactly the same as any other Java EE app. We opted out of using JTA which means we have to manually manage transactions. In such cases we don’t believe that that is in and of itself a bad thing. Sometimes a bit more transparency may be a good thing.
In our placeOrder(Book) method you can see an example of communicating with our other microservice via the REST APIs and not directly in code. This way we successfully decoupled our microservices from one another.
A microservice can and should contain multiple REST resources. To put it differently; it should contain as many REST resources as it needs to perform the functions it is designed to do.
We can also notice that we are injecting our EntityManagerwith the @PersistenceContext annotation. Since we have included CDI to our microservice this will work as expected. We do however need to make sure that we have included the beans.xml file in our META-INF directory. That way we tell CDI to enable injection in this module.
<?xml version="1.0" encoding="UTF-8"?>
<beans xmlns="http://xmlns.jcp.org/xml/ns/javaee" xmlns:xsi="http://www.w3.org/2001/XMLSchema-instance"
       xsi:schemaLocation="
		http://xmlns.jcp.org/xml/ns/javaee
		http://xmlns.jcp.org/xml/ns/javaee/beans_1_2.xsd"
       bean-discovery-mode="annotated">

</beans>
Alright, let’s now return to our catalogue model and finish our example.
Catalogue module
We have already added the required dependencies when we were getting familiar with KumuluzEE, except for the JPA module that we created before.
<dependency>
    <groupId>com.acme.books</groupId>
    <artifactId>models</artifactId>
    <version>${project.version}</version>
</dependency>
All that remains now is the REST resource implementation. It will actually be very similar to our orders resources.
@ApplicationPath("/")
public class BooksApplication extends javax.ws.rs.core.Application {

}
And the resource:
@Path("/books")
@Produces(MediaType.APPLICATION_JSON)
@Consumes(MediaType.APPLICATION_JSON)
@RequestScoped
public class BooksResource {

    @PersistenceContext(unitName = "books")
    private EntityManager em;

    @GET
    public Response getBooks() {

        TypedQuery<Book> query = em.createNamedQuery("Book.findAll", Book.class);

        List<Book> books = query.getResultList();

        return Response.ok(books).build();
    }

    @GET
    @Path("/{id}")
    public Response getBook(@PathParam("id") Integer id) {

        Book b = em.find(Book.class, id);

        return Response.ok(b).build();
    }

    @POST
    public Response createBook(Book b) {

        b.setId(null);

        em.getTransaction().begin();

        em.persist(b);

        em.getTransaction().commit();

        return Response.status(Response.Status.CREATED).entity(b).build();
    }
}
Again make sure you have added the same beans.xmlfile as before to your META-INF directory in order to enable injection.
Putting it all together
And we’re done. We have just created two microservices that will run independently of each other. However they can still work together with the help of REST interfaces and of course share common resources like a database. We can now build and run them independently. Because we will be starting two HTTP servers, we must use a different port for the other server. We can easily control this using thePORT environment variable.
$ PORT=3000 java -cp catalogue/target/classes:catalogue/target/dependency/* com.kumuluz.ee.EeApplication

$ PORT=3001 java -cp orders/target/classes:orders/target/dependency/* com.kumuluz.ee.EeApplication
We can now browse our microservices and see them in action onhttp://localhost:3000 andhttp://localhost:3001 respectively.
In conclusion
We have shown how KumuluzEE can help you create microservices using standard Java EE specification and APIs. With KumuluzEE we are able to bridge the gap between Java EE and the microservice architecture and focus solely on developing with what we already know but in a completely new way. KumuluzEE seamlessly sets everything up automatically so it just works, while still allowing a great deal of customisation to accommodate our needs. On top of that it makes it easy to run our microservices. This opens a world of possible cloud configurations with almost any cloud provider out there that are simply not possible now. It also provides all the other benefits of microservices, including more flexible architecture, easier maintenance, better scalability, etc. without the added configuration overhead.
Read on
KumuluzEE Extensions
In this tutorial, we have described the basic steps for developing a microservice. Microservice architecture, or more generally, cloud-native architecture opens several new perspectives, related to microservice configuration, logging, discovery, circuit-breakers, metrics, security, event streaming and more. KumuluzEE provides extensions, which address these topics. The KumuluzEE framework already provides support for configuring microservices using environment variables or property files or YAML files. KumuluzEE extensions provide even broader functionalities, not only for configuration, but also for logging, discovery, circuit-breakers, metrics, security, event streaming and more. We don’t cover them here as each one would need a separate blog post to properly describe. For now you can find them on our home page or on the GitHub page and look out for future blog posts covering them soon.